How to adjust Google Ads conversions from Shopify refunded orders
According to the National Retail Federation, return rates in 2022 were 17%, and in some e-commerce sectors (such as Fashion), it can be as high as 40%! There's no doubt that returns are here to stay; it's the nature of an online retail business. However, it would be best not to look at or optimise your future advertising with data that includes returns. The more accurate your revenue data, the better the bidding algorithms will work when making real-time bidding decisions and ensure that adaptive historical weighting calculations are correct.
Most e-commerce companies have their most significant marketing spend on Google Ads, so it's crucial to ensure that the data in your Google Ads account is as accurate as possible.
Luckily Google has released a new feature for Google Ads called Conversion Adjustments that allows you to Restate or Retract conversions from your account if you've refunded or part-refunded an order. This article explains how to utilise this feature using a Shopify store.
Use the Pinpointed Shopify App
Pinpointed is the only Shopify app that can retract or restate Google Ads conversions automatically from Shopify refund data, saving you time and ensuring consistency in the data flow. You can add it to your store here.
Pinpoint shows you exactly how many conversions have been adjusted, or fully refunded. It also shows your which ones, so you can connect refunds with the specific orders. It has an intuitive dashboard which shows all the key returns metrics. It runs daily, and is totally automated, keeping your data accurate without you having to do any manual spreadsheet work!
How to set up:
- Install Pinpointed on your Shopify store.
- Run through the one time Onboarding
- njoy automated Conversion Adjustments and Retractions without lifting a finger!
Manually restate/retract conversions with Shopify (Excel and use of the SUMIF, INDEX, MATCH and TEXT formula required)
The Conversion Adjustment Template
Download the conversion upload template here. Other formats (such as Google Sheets) are available here.
The template shows the following columns:
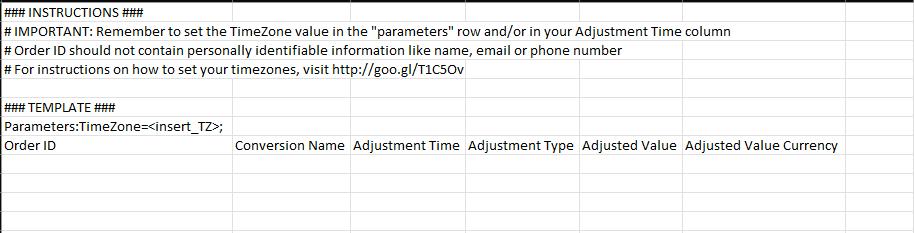
Order ID: the transaction ID that is send to Google when a conversion occurs. Within Shopify this is usually the Order Name, but it can be the Order ID or Order Number.
Conversion Name: The exact name of the eCommerce conversion that is to be adjusted. This can be found within the Conversions section of Google Ads (under Tools and Settings, Conversions). It's called Conversion Action, and should be the Primary Action, with an All Conv. Value, for example:

Adjustment Time: The time the refund took place (must be after the order of course)
Adjustment Type: RETRACT or RESTATE, depending on the conversion type (RETRACT for full refund, RESTATE for part refund)
Adjusted Value: the new value after refund has been processed
Adjusted Value Currency: The currency of the Order
We will populate this template using data obtained from Shopify!
Obtaining the data from Shopify
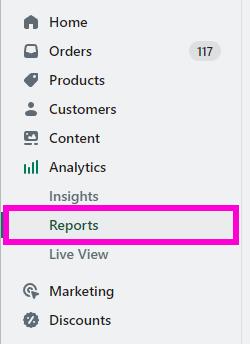
1. Login to Shopify and click Analytics the Reports
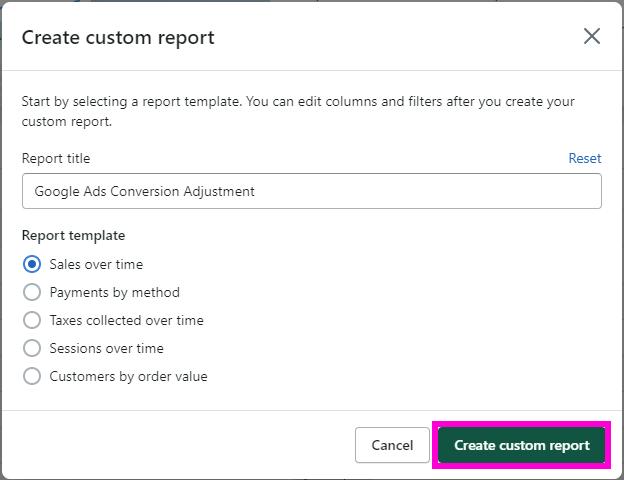
2. Click Create custom report
3. Name your new report and choose the Report Template Sales over time
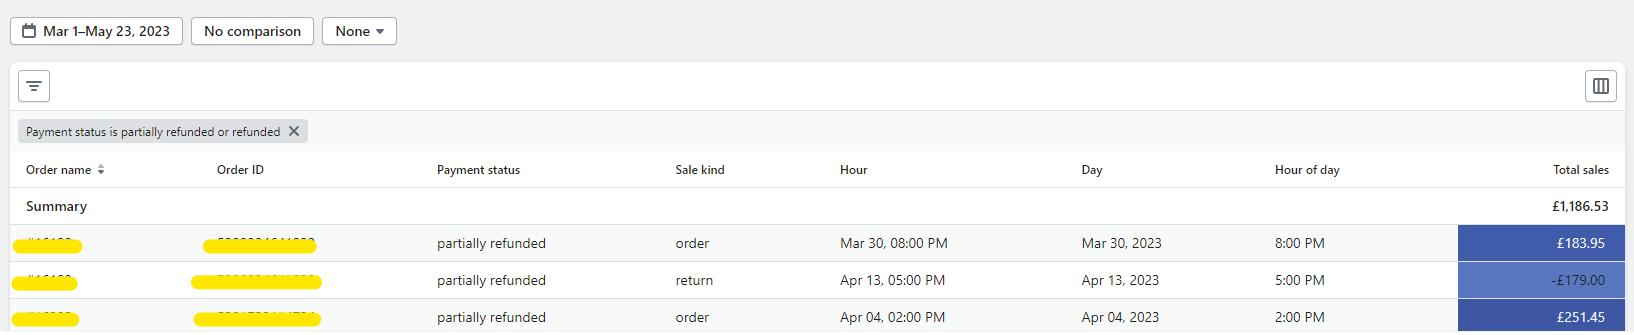
4. When you have your report, first click the Comparison date and choose No comparison
5. Change the date frequency to None
6. Click columns and select the following columns:
- Order name
- Order ID
- Payment status
- Sale kind
- Hour
- Day
- Hour of day
- Total sales
7. Update the date range to the last 55 days. Google allows conversion adjustments up to 55 days from when the conversion was first reported
8. Click the filter and choose Payment status. Select Partially refunded and Refunded and then click apply
The report should look something like this:
10. Save the report so what you have set up is remembered for next time
11. Click Export and download the CSV
Format the Data using Excel
1. Open the CSV in Excel
2. Ensure that the Order ID column is showing real numbers, not a Scientific format, change to Numbers to make sure they look like Order IDs within Shopify
3. Select all of your Order Names and Order IDs and copy them to an empty set of columns
4. Select all of the newly copied Order IDs and Names and choose Data then Remove Duplicates. This ensures that you have a unique set of Order Names and IDs
5. Name these columns Unique Order Name and Unique Order ID respectively
6. Use a SUMIF formula to identify the Order Name or Order ID in the original table and to match it with the value in the deduplicated table. Use the Total Sales column of the original table as the Sum Range. It should look something like this if using the Order Name:

Name this column Adjusted Order Value
7. You should now have a list of Order Names and Order IDs with the Adjusted Order Value, taking into account the refund. Next, we need to create the adjustment time (the time the refund was processed)
To obtain the time that the refund was processed, we need to look at the rows where the Sale Kind is return. We also need to put it in a specific date format for Google to understand (full list here). The format we will use is yyyy-MM-dd HH:mm:ss
Use a TEXT, INDEX, MATCH to collect the correct time from the original table and format it correctly in the deduplicated table. The formula to use is (we're using Order Name):
=TEXT(INDEX(hour_range,MATCH(1,order_name_range=unique_order_name)*sale_kind_range=”return”),0)),"yyyy-MM-dd HH:mm:ss"))
Highlighted attributes need to be updated
The deduplicated table will look something like this now:
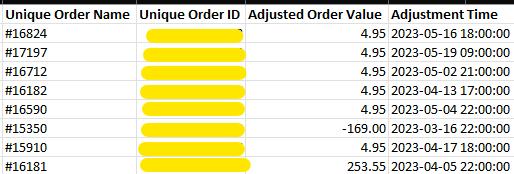
Name this column Adjustment Time
10. Remove any negative order values. The reason that they're negative is because the order will have been placed before the date range set when downloading data from Shopify, so these orders can be discarded as Google will not be able to restate them (too long ago)
Put the data into the Template
1. Copy the columns and Paste (as values) to the Google Conversions Adjustments Template downloaded earlier
2. Ensure that the ORDER ID or Adjusted Order Value have not been pasted as a Scientific Format. Change to Numbers with no decimal place if they have.
3. Move the columns to the right columns in the template, matching to the following:
- Order ID: Either Unique Order Name or Unique Order ID - this is trial and error to see which one you need to set. There's no easy way of knowing what Google is receiving, and when gets sent varies by Conversion tracking set up
- Conversion Name: the Conversion Action Name from the Google Ads account
- Adjustment Time: Adjustment Time column
- Adjustment Type: RESTATE can always be used
- Adjusted Value: Adjusted Order Value column
- Adjusted Value Currency: the Currency of the order
4. Once you have move the columns it should look like this:
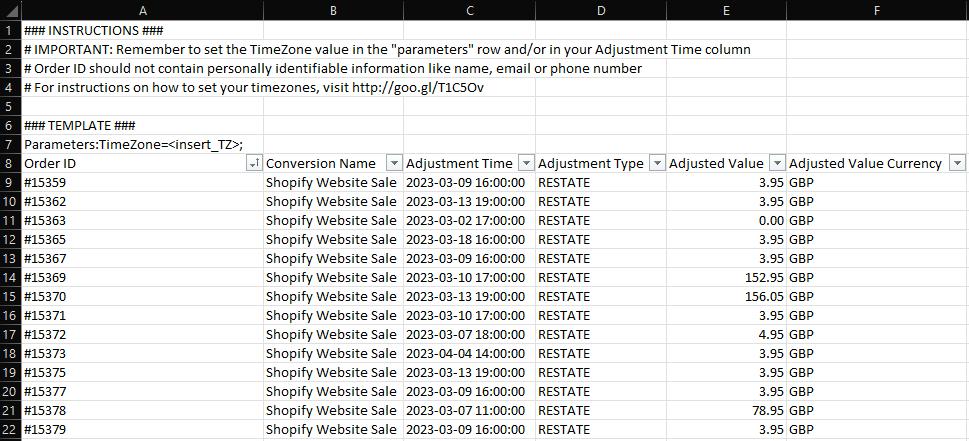
5. Update the TimeZone parameter in row 7 to the correct time zone found here (e.g. Europe/London)
Upload the Conversion Adjustments
1. In Google Ads go to Tools and Settings, Conversions
2. Click Upload on the left hand navigation
3. Click the Blue Add button
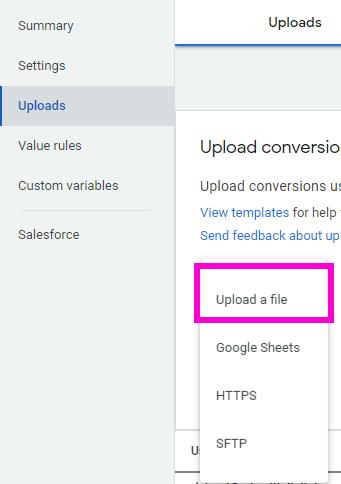
4. Click Source, Upload a File:
5. Choose the file and click Preview
6. The Preview will run, showing you the number of changes to be made
7. Once you’re happy with the preview, select Apply and the conversions will be restated within your Google Ads account
8. Install Pinpointed so you don’t have to do that again :)